Related
Expose NAT Services Across Two Kubernetes Clusters with Tailscale
A production-style setup to publish private k3s services through a public microk8s edge cluster using the Tailscale Kubernetes Operator.
Popular topics
A hands-on experiment building a self-managed at-home AI cluster with k3s, Ollama, and LiteLLM.

This post covers my hands-on experiment of building a local, self-managed AI cluster at a reasonable price point for at-home AI/LLM usage.
I like using LLMs and exploring their capabilities; I'm not very fond of the direction the industry is taking.
But I don't think the development in the 'AI/LLM' space will be halted, although I do think there is a direction that is better for society overall.
That is the future where good small and performant AI models are available for everyone to host themselves on their own compute. Keeping all the data private and allowing for much better encapsulation and sandboxing of LLM workloads.
First, we need hardware. As seen in my initial OS LLM tests, I have access to a basic Bosgame mini PC with the new Ryzen AI 395 chip. After those initial tests, and considering current RAM rarity and prices, I extended my setup with another Bosgame mini PC. This also allows me to test and use a more complex local multi-node Kubernetes setup.
Thus for this article we will use 2x AMD Strix Halo 128GB RAM mini PCs; we will allocate both to have 94GB VRAM in BIOS; and we will leave the remaining RAM for backend and Kubernetes resources and other services.
Since the setup gets more complex, I prefer not to rely on Docker Compose alone and instead choose an orchestration tool that I can also manage externally through an API. For me, that choice is Kubernetes; and for system configuration management I opted to use k3s, instead of my usual microk8s.
Now we have solutions for hardware ✅ and clustering software ✅. Both of the nodes currently run in a home-subnetwork with their own router ✅. But since I plan to set up a multi-region cluster in the future, I am already extending this setup to work across networks and across LAN/WLAN.
For that, we will use Tailscale in this setup; I'm also planning to build a more static setup that will work with WireGuard only in the future; but for now we choose convenience.
Still, there are more missing parts:
So for 1. I'll choose a multi-node Ollama Helm chart install; the initial aim is to have two nodes with the same models available so they can be load-balanced. For 2. I'll choose LiteLLM as it's fairly easy to configure, supports API authorization, and supports the OpenAI API schema; and has a bunch of handy load balancing and routing features.
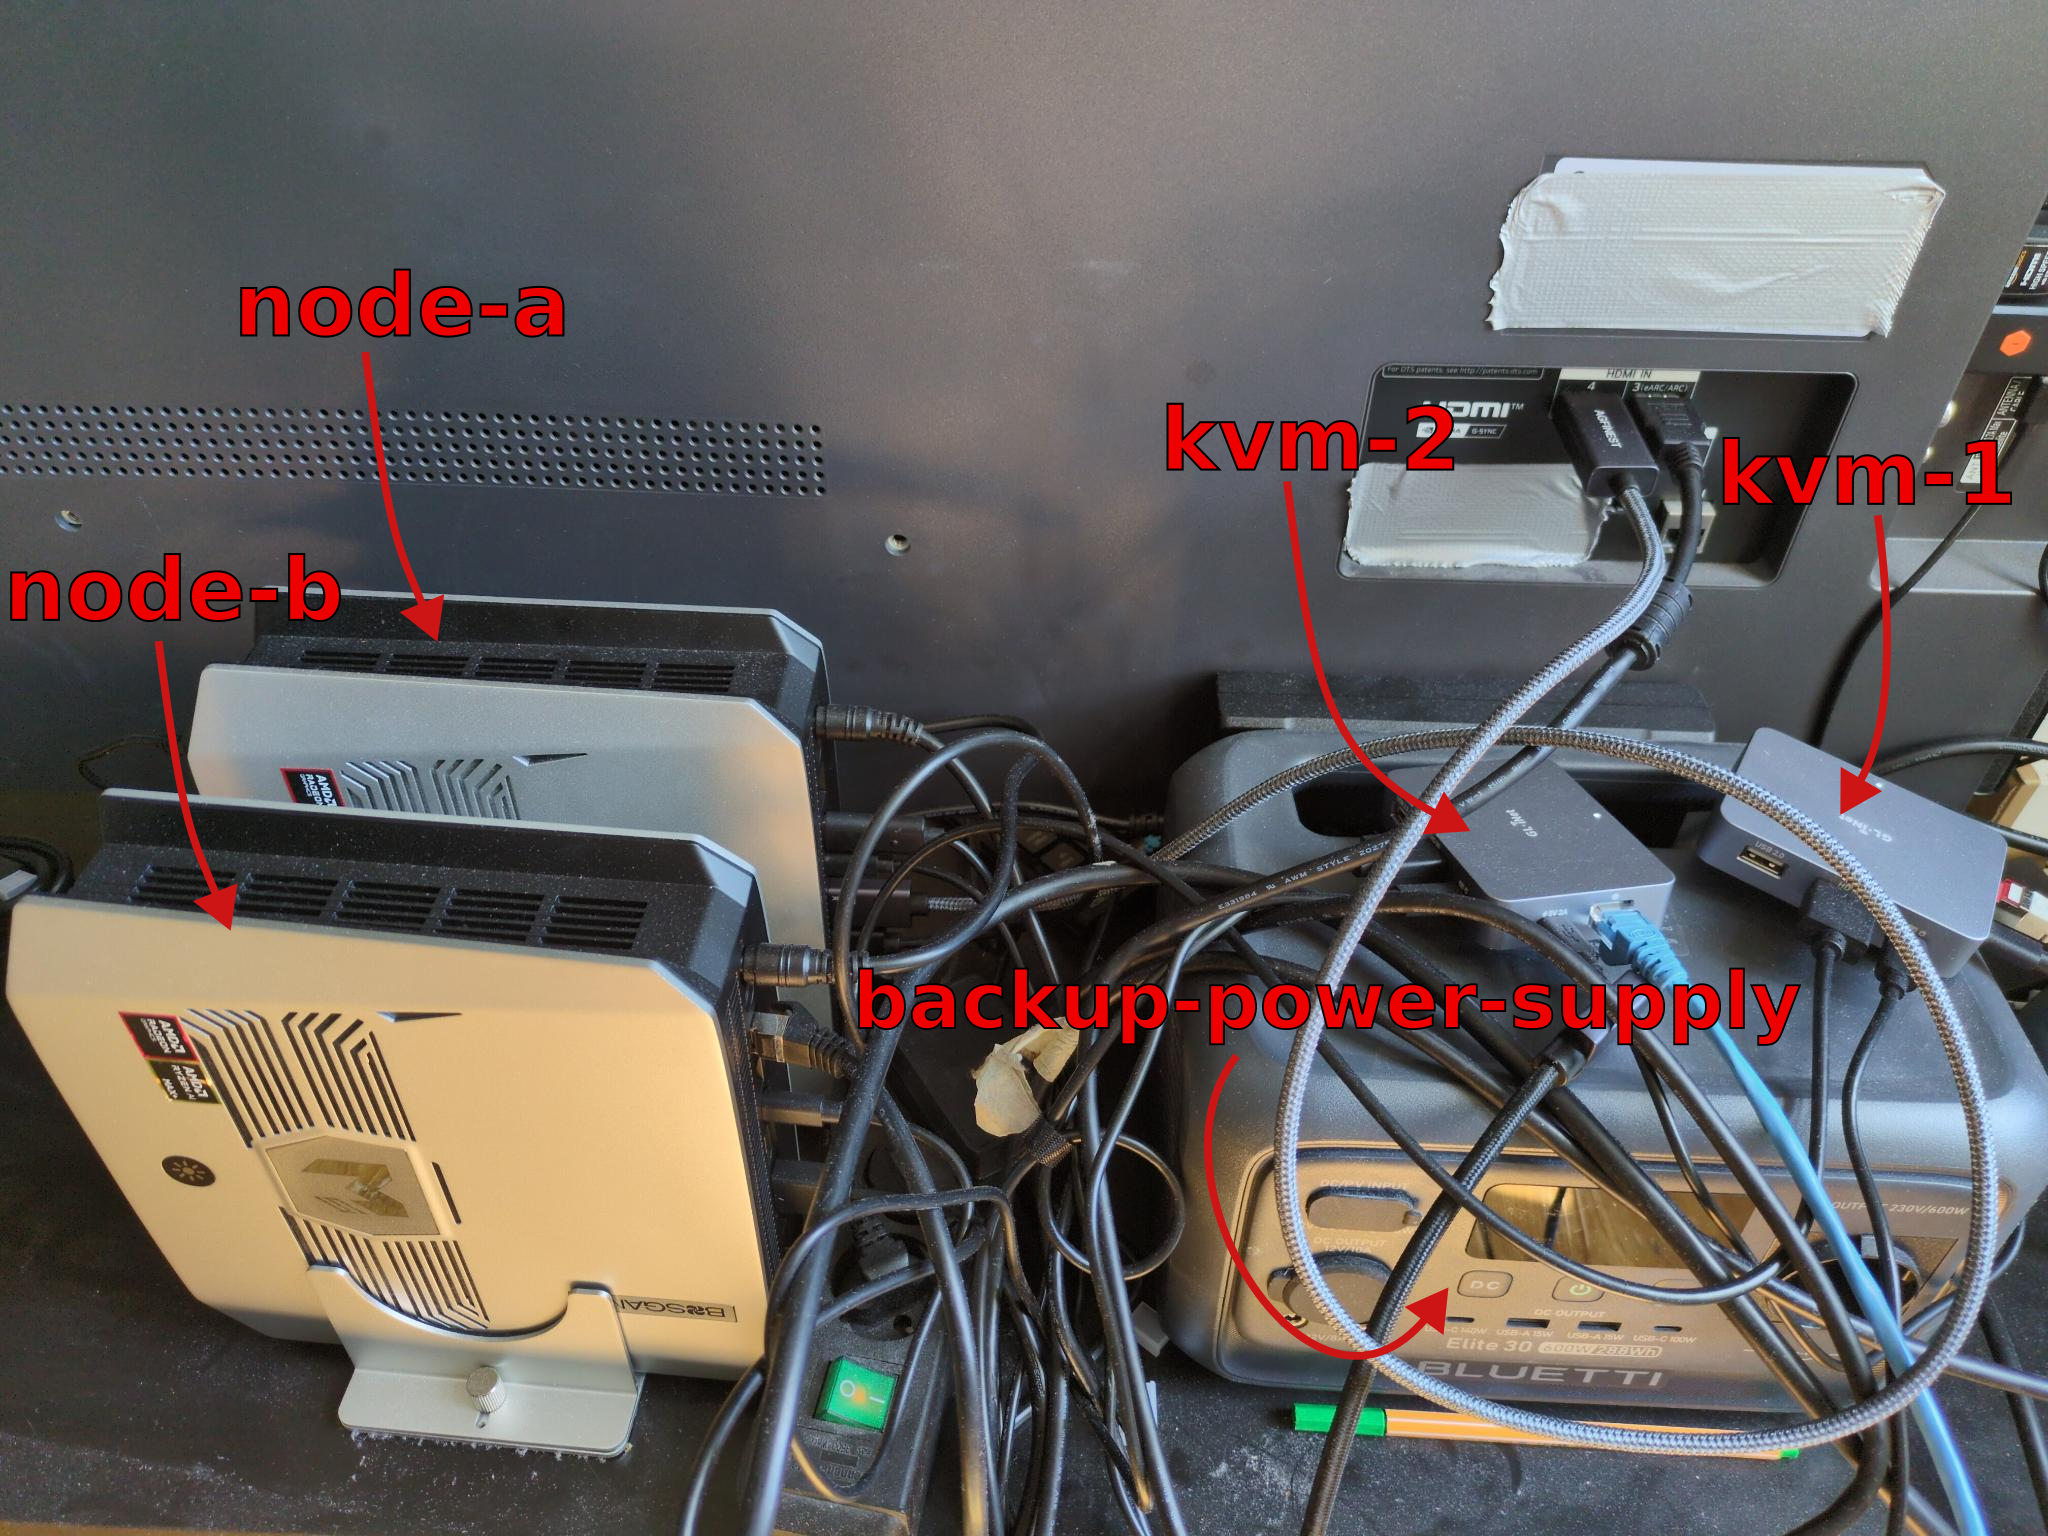
For easy configuration and management of both nodes, I've connected both to KVMs. I can control, observe, and manage both nodes simply from my laptop; this is important as I do not have enough screens and keyboards, and I also don't want to manually set up all nodes.
Here is a picture of the wiring; I've also configured a simple hyprland setup with screen mirroring at my display resolution to allow me to easily view the screen on KVM and another monitor.
To configure and manage the cluster, I want to avoid extensive manual setup while still keeping the setup repeatable and orchestratable from outside. Thus I chose to install NixOS on both nodes; in my NixOS setup I can easily set up SSH access keys, my tailnet, and everything else in a central deterministic configuration.
Notably I ensure each system runs
NixOS, amdgpu, k3s ( see below )And of course all required basic system tooling:
git, vim, k9s, kubectl, helm etc...Also I've configured basic SSH keys for access to my nodes from inside my tailscale network. Similarly, I've created a setup that lets me pre-define hosts per system. This will be important later when we obtain DNS-01 certificates to resolve, for example, our LiteLLM dashboard through our tailnet.
Here you can see my two KVM control tabs open, one selected and showing current VRAM and CPU usage through btop and amdgpu.

In networking, I chose to route cluster traffic over the tailnet to allow me to have mini PCs connected via LAN and WLAN, to be able to move them across location and use them across networks in the future.
I configured one cluster node to be the k3s agent and the other to be the server. As said I've opted to connect over the tailnet directly, the cluster configuration is managed directly through nix; this generally equates to roughly this k3s command:
TOKEN="$(openssl rand -hex 32)"
sudo install -d -m 700 /etc/secrets/k3s
echo "$TOKEN" | sudo tee /etc/secrets/k3s/token >/dev/null
k3s server \
  --cluster-init \
  --token-file "/etc/secrets/k3s/token" \
  --node-external-ip "node-a" \
  --tls-san "node-a" \
  --flannel-iface "tailscale0"

k3s agent \
  --server "https://node-a:6443" \
  --token-file "/etc/secrets/k3s/token" \
  --flannel-iface "tailscale0"
Wait for the services to become available and retrieve the kubeconfig.yaml from the main k8s node.
sudo cp /etc/rancher/k3s/k3s.yaml ./kubeconfig.yaml
sudo chown "$USER":"$USER" ./kubeconfig.yaml
Note: this part will differ based on your DNS provider
To access the LiteLLM API in the browser conveniently, we want to have a real certificate!
kubectl create namespace cert-manager

helm repo add jetstack https://charts.jetstack.io
helm repo update

helm upgrade --install cert-manager jetstack/cert-manager \
  --namespace cert-manager \
  --set crds.enabled=true
export KUBECONFIG=./kubeconfig.yaml
kubectl create namespace cert-manager || true
helm repo add cert-manager-webhook-ionos https://fabmade.github.io/cert-manager-webhook-ionos
helm repo update

helm upgrade --install cert-manager-webhook-ionos \
  cert-manager-webhook-ionos/cert-manager-webhook-ionos \
  --namespace cert-manager
Create API secret ionos-secret.yaml
kubectl apply -f - <<'EOF'
apiVersion: v1
kind: Secret
metadata:
  name: ionos-secret
  namespace: cert-manager
type: Opaque
stringData:
  IONOS_PUBLIC_PREFIX: "<YOUR DNS PROVIDER KEY PREFIX>"
  IONOS_SECRET: "<YOUR DNS PROVIDER KEY>"
EOF
Create a production cluster issuer letsencrypt-ionos-prod-account-key:
kubectl apply -f - <<'EOF'
apiVersion: cert-manager.io/v1
kind: ClusterIssuer
metadata:
  name: letsencrypt-ionos-prod
spec:
  acme:
    email: "<your-email>"
    server: https://acme-v02.api.letsencrypt.org/directory
    privateKeySecretRef:
      name: letsencrypt-ionos-prod-account-key
    solvers:
      - dns01:
          webhook:
            groupName: acme.fabmade.de
            solverName: ionos
            config:
              apiUrl: https://api.hosting.ionos.com/dns/v1
              publicKeySecretRef:
                name: ionos-secret
                key: IONOS_PUBLIC_PREFIX
              secretKeySecretRef:
                name: ionos-secret
                key: IONOS_SECRET
EOF
First we need to teach our cluster to work with our integrated graphics, then we can install ollama with vulkan enabled and run llms.
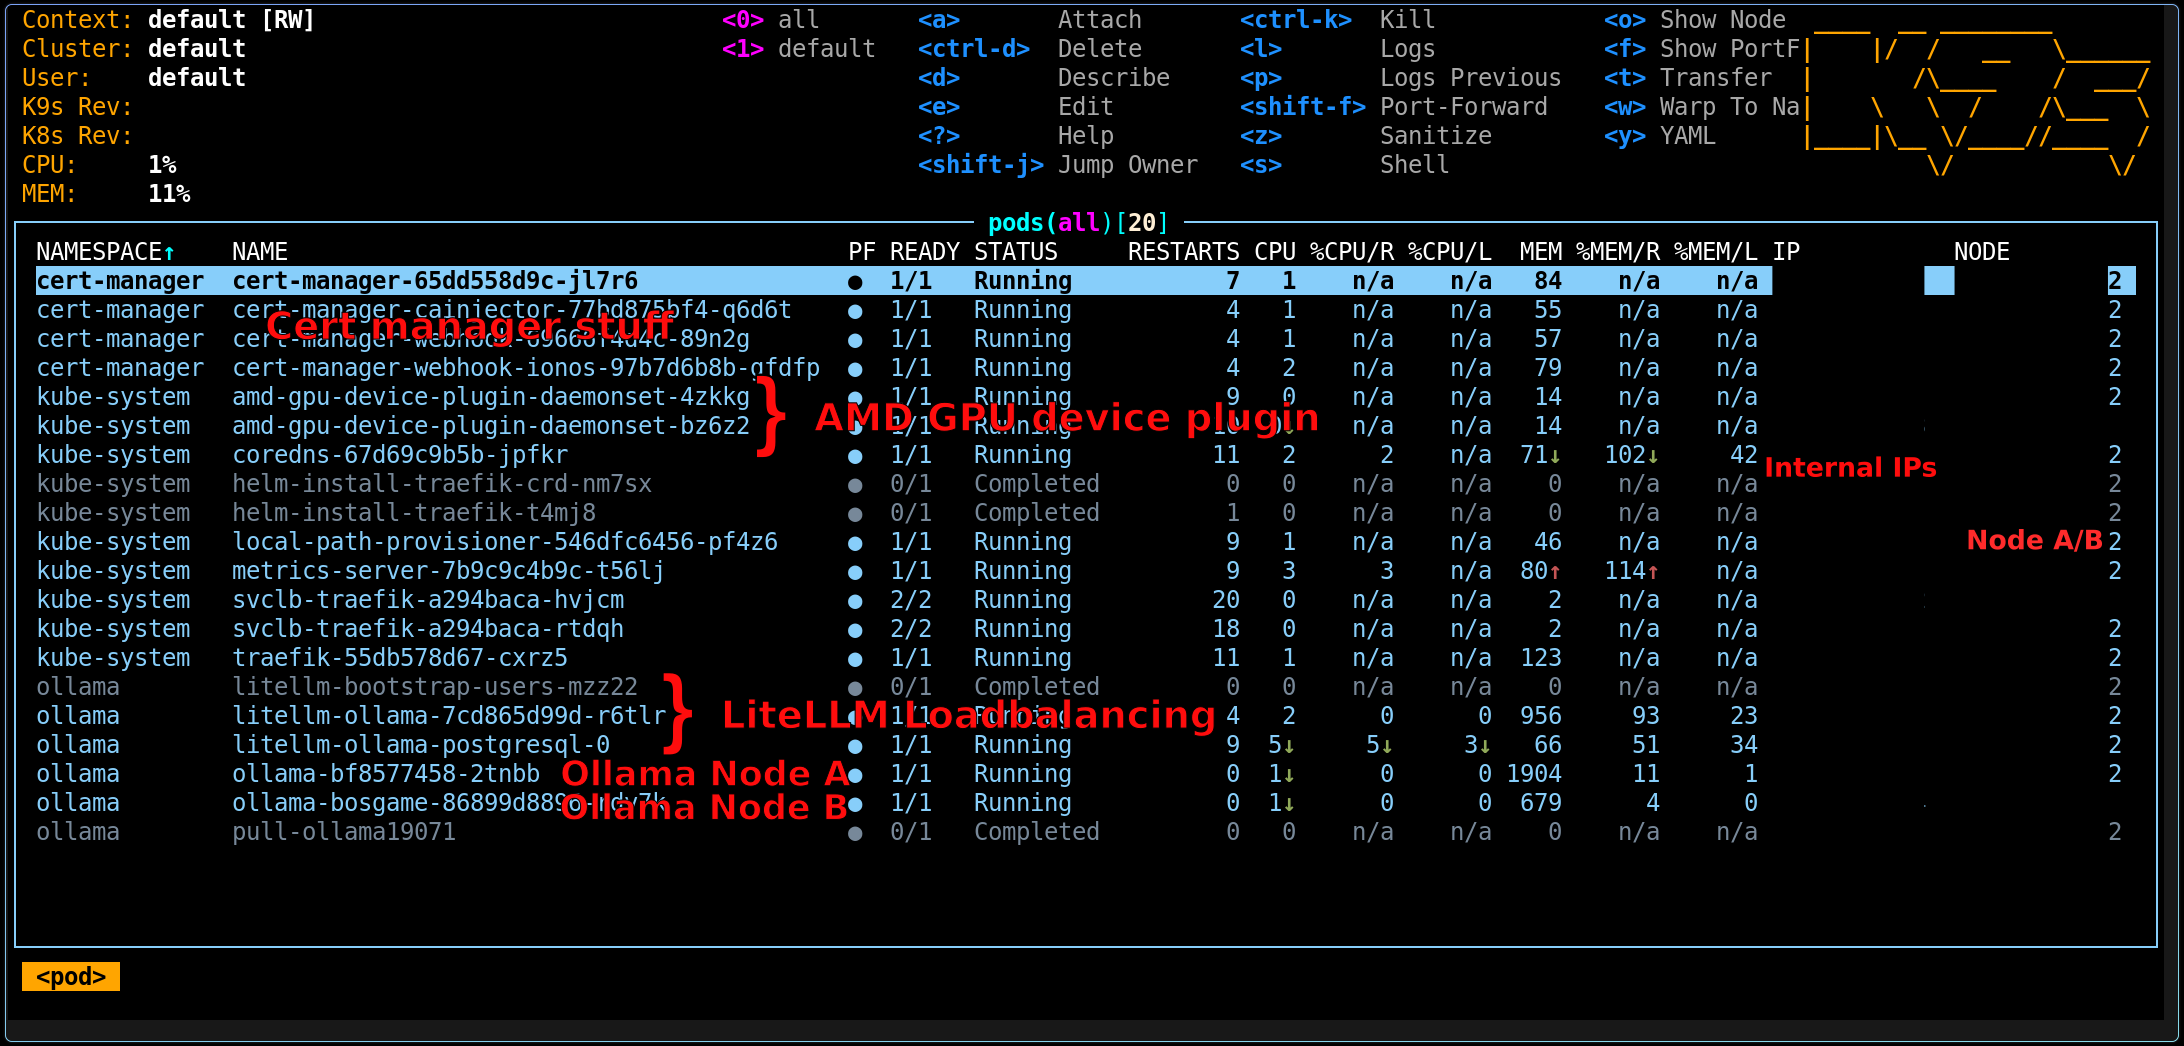
Now we have two devices with AMD integrated GPUs and Kubernetes installed. But we can see that the Kubernetes cluster doesn't yet have AMD GPU resources listed on nodes:
kubectl get nodes -o jsonpath='{range .items[*]}{.metadata.name}{"\t"}{.status.allocatable.amd\.com/gpu}{"\n"}{end}'
If GPU plugin is not installed yet, the AMD column is usually empty or <none>.
helm repo add rocm https://rocm.github.io/k8s-device-plugin/
helm repo update
Now we can install the ROCm GPU plugin:
helm upgrade --install amd-gpu rocm/amd-gpu \
  --namespace kube-system
Now we can see the GPUs listed:
kubectl get nodes -o jsonpath='{range .items[*]}{.metadata.name}{"\t"}{.status.allocatable.amd\.com/gpu}{"\n"}{end}'
I opted to use this Helm chart. Add the Helm chart:
helm repo add otwld https://helm.otwld.com/
helm repo update
helm search repo otwld/ollama --versions
We create some basic values that allow us to replicate the setup 1:1 on our other node:
fullnameOverride: ollama

image:
  repository: ollama/ollama
  tag: "0.19.0"

ollama:
  gpu:
    enabled: true
    type: amd
    number: 1

persistentVolume:
  enabled: true
  size: 120Gi

service:
  type: NodePort
  port: 11434
  nodePort: 31434

ingress:
  enabled: true
  className: traefik
  annotations: {}
  hosts:
    - host: ollama.home.arpa
      paths:
        - path: /
          pathType: Prefix
  tls: []

nodeSelector:
  kubernetes.io/hostname: node-b

extraEnv:
  <...ENV set-up see benchmark below...>

resources:
  requests:
    cpu: "2000m"
    memory: 16Gi
  limits:
    cpu: "6000m"
    memory: 112Gi

tests:
  enabled: true
Note that we apply these values twice with a minimal modification:
nodeSelector:
  kubernetes.io/hostname: node-a
vs
nodeSelector:
  kubernetes.io/hostname: node-b
This ensures we have identical Ollama instances running on both hosts, but this also means that we always need to make sure both Ollama instance node states are synced.
I chose to use this Helm chart as a base setup for LiteLLM.
We want our traffic to be routed based on system usage, i.e. when one mini PC is under NPU load it should receive less traffic. Optimally we also want the API to block traffic if the system is under so much load that the experience would be too bad (more on that later).
Setup basic chart values:
replicaCount: 1

image:
  repository: ghcr.io/berriai/litellm-database
  pullPolicy: IfNotPresent
  tag: main-v1.82.3-stable

service:
  type: ClusterIP
  port: 4000

ingress:
  enabled: true
  className: traefik
  annotations: {}
  hosts:
    - host: litellm.home.arpa
      paths:
        - path: /
          pathType: Prefix
  tls: []

db:
  useExisting: false
  deployStandalone: true

migrationJob:
  enabled: true

resources:
  requests:
    cpu: "500m"
    memory: 1Gi
  limits:
    cpu: "2000m"
    memory: 4Gi
Now, since we have set up initial cluster DNS-01 challenges, we can request an official Let's Encrypt certificate via:
ingress:
  enabled: true
  className: traefik
  annotations:
    cert-manager.io/cluster-issuer: letsencrypt-ionos-prod
  hosts:
    - host: <your-domain>
      paths:
        - path: /
          pathType: Prefix
This will make it much easier to access our LiteLLM UI through the browser as it won't complain about SSL and self-signed certificates.
But note you still need to register <your-domain> in your own /etc/hosts as we did NOT create a public DNS entry. (Shout-out to JannisT for this setup suggestion.)
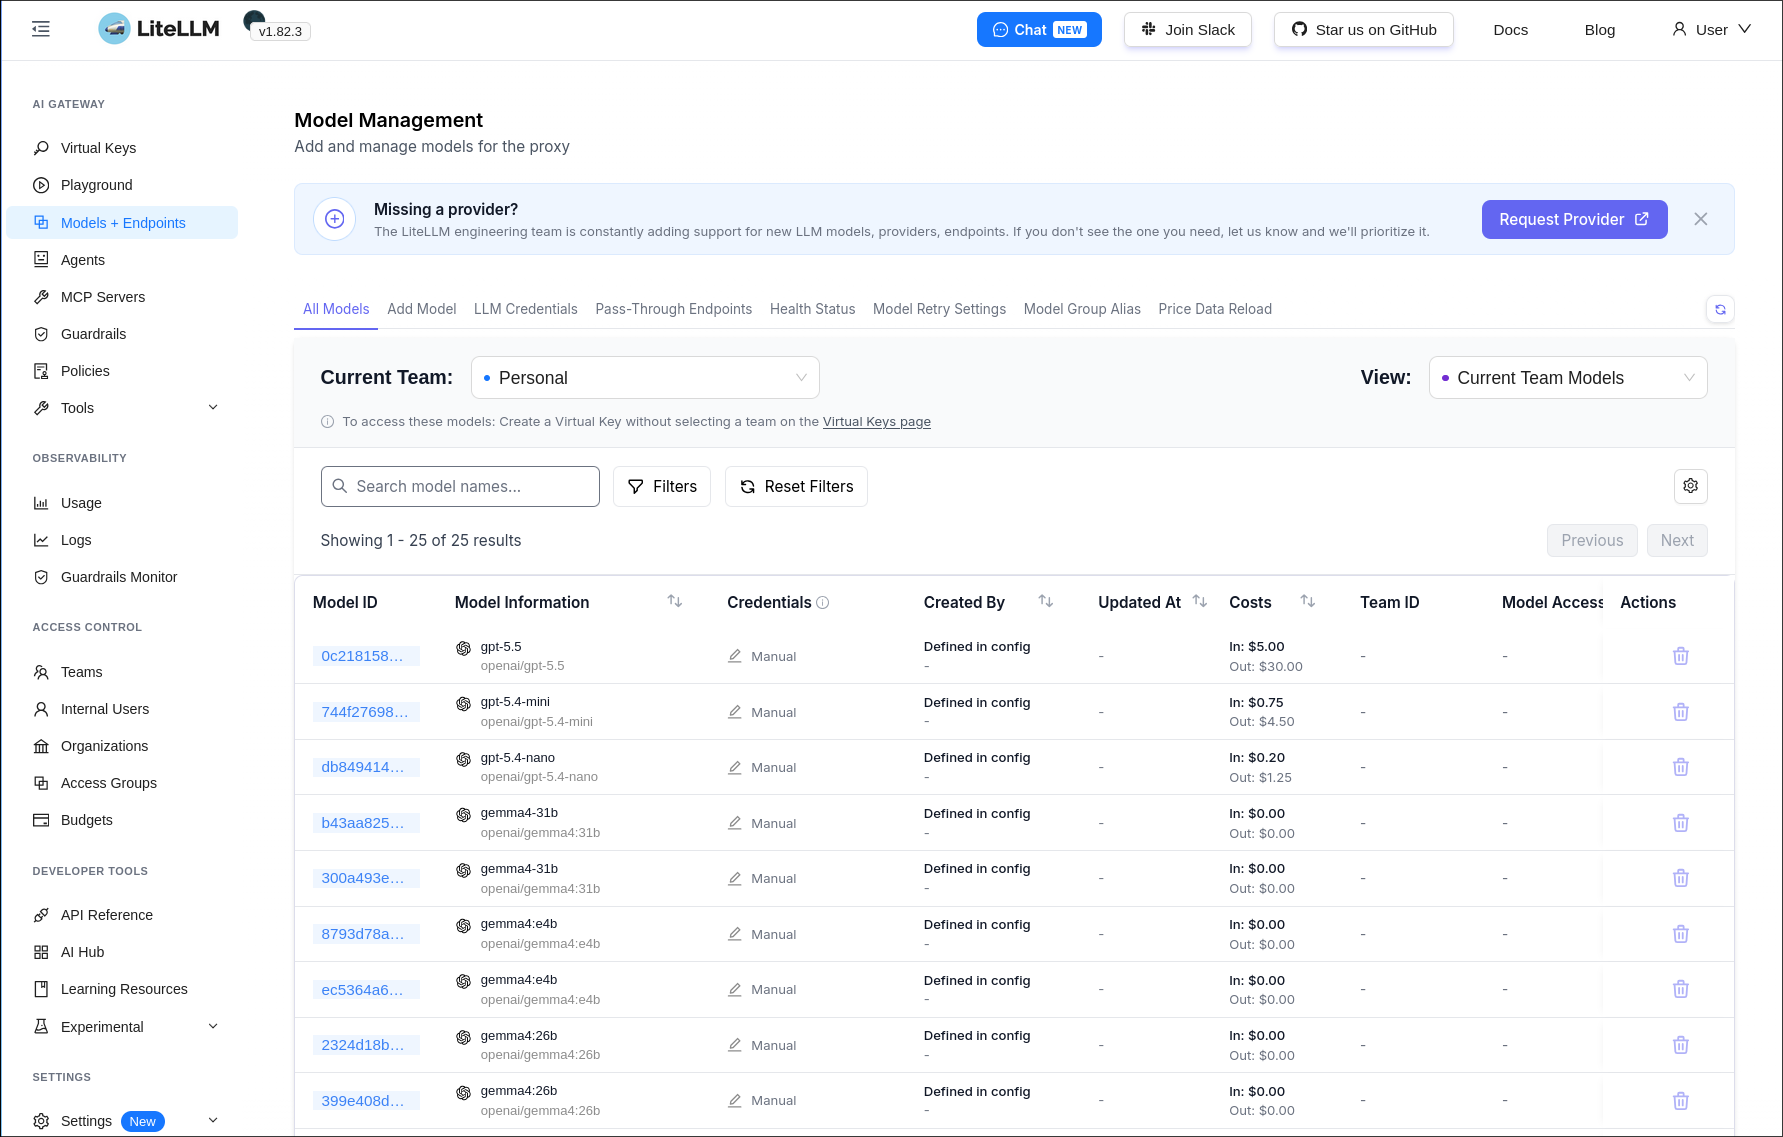
Then start by adding your models. Depending on node setup, you need to register model endpoints; for me it's one per cluster node, so two. We choose to throttle requests depending on model size, this configuration will be further adjusted and tested in future blog posts.
proxy_config:
  model_list:
  - model_name: gemma4:e4b
    litellm_params:
      model: openai/gemma4:e4b
      api_base: http://ollama.ollama.svc.cluster.local:11434/v1
      api_key: "none"
      rpm: 60
  - model_name: gemma4:e4b
    litellm_params:
      model: openai/gemma4:e4b
      api_base: http://ollama-bosgame.ollama.svc.cluster.local:11434/v1
      api_key: "none"
      rpm: 60
Now finally we also want to configure the router setup.
I opted to generate a general PROXY_MASTER_KEY instead of individual keys per endpoint, just for benchmarking for now.
  router_settings:
    routing_strategy: usage-based-routing
    num_retries: 2
    timeout: 600
  litellm_settings:
    drop_params: true
    request_timeout: 600
  general_settings:
    master_key: os.environ/PROXY_MASTER_KEY
I found it very convenient to also use LiteLLM to route paid external providers, as this gives me a central location to manage access and tokens.
As I've also run my benchmark on some public providers for comparison, this was also set up, e.g. one could add this to integrate OpenAI gpt-5.5 or gpt-5.4-mini:
  model_list:
    - model_name: gpt-5.5
      litellm_params:
        model: openai/gpt-5.5
        api_base: https://api.openai.com/v1
        api_key: os.environ/OPENAI_API_KEY
        rpm: 120
    - model_name: gpt-5.4-mini
      litellm_params:
        model: openai/gpt-5.4-mini
        api_base: https://api.openai.com/v1
        api_key: os.environ/OPENAI_API_KEY
        rpm: 180
This can also be used very conveniently to manage LLM access, e.g. in a company. And finally we can install the chart:
helm --kubeconfig "kubeconfig.yaml" upgrade --install litellm-ollama \
  oci://docker.litellm.ai/berriai/litellm-helm \
  --version 1.82.3 \
  --namespace ollama \
  --create-namespace \
  --values "litellm-values-ollama-lb.yaml"
Now we can retrieve the master key:
kubectl --kubeconfig "kubeconfig.yaml" -n ollama get secret litellm-ollama-masterkey -o jsonpath='{.data.masterkey}' | base64 -d
Setup complete. Now we can see all our clusters and nodes running, and we're ready for benchmarking.
Compared to the last benchmark, I wanted to extend the test range. Specifically, I'm interested in finding out:
To reset the tests, I always ensure that all models are killed and fully unloaded, and I restart the Ollama containers every time. ./scripts/kill_all_running_completions.sh --force-restart wraps a Kubernetes exec command into a simple script that can be hooked into my updated Ollama benchmark. I also refactored the benchmark to work in 'API only' mode so I can compare my results with known existing LLM hosters (for example OpenAI).
I also observed that it is very important to preload the Ollama model, because TTFT is significantly reduced when the model is already loaded into memory. After observing this, I had to re-run all tests because the initial TTFT values would significantly drag down the overall average.
LITELLM_KEY='<YOUR LITELLM API KEY>' \
LITELLM_UNLOAD_COMMAND='./scripts/kill_all_running_completions.sh --force-restart' \
CONTEXT_STEPS=8 \
API_PRIME_REQUESTS=2 \
./scripts/run-full-test.py model-configs-cluster/<llm-benchmark-config>.yaml
In the first version of this article, I tested the following models:
deepseek-r1:1.5bdeepseek-r1:14bdeepseek-r1:32bdeepseek-r1:7bdeepseek-r1:8bgemma4-31bgemma4:26bgemma4:e4bnemotron-cascade-2:30bqwen3.6:27bqwen3.6:35bgpt-5.4-minigpt-5.4-nanogpt-5.5Mainly due to already having spent extended time setting up the cluster and benchmarking, and also being rate-limited by Ollama for model downloads after some time...
Actually I re-ran the benchmark with updated settings, see further below for improved results
| Model | Avg tokens/s | Avg TTFT (ms) | Prompts | Max tokens | Temp | Stream | Ctx min | Ctx max |
|---|---|---|---|---|---|---|---|---|
deepseek-r1:1.5b | 150.76 | 293.03 | 5 | 120 | 0.2 | True | 256 | 8192 |
deepseek-r1:14b | 24.34 | 510.09 | 5 | 120 | 0.2 | True | 256 | 8192 |
deepseek-r1:32b | 11.21 | 722.59 | 5 | 120 | 0.2 | True | 256 | 8192 |
deepseek-r1:7b | 43.63 | 391.04 | 5 | 120 | 0.2 | True | 256 | 8192 |
deepseek-r1:8b | 38.84 | 378.64 | 5 | 120 | 0.2 | True | 256 | 8192 |
gemma4-31b | 10.81 | 882.37 | 5 | 120 | 0.2 | True | 256 | 8192 |
gemma4:26b | 34.91 | 463.75 | 5 | 120 | 0.2 | True | 256 | 8192 |
gemma4:e4b | 22.23 | 881.12 | 5 | 120 | 0.2 | True | 256 | 8192 |
nemotron-cascade-2:30b | 63.54 | 477.57 | 5 | 120 | 0.2 | True | 256 | 8192 |
qwen3.6:27b | 10.90 | 556.31 | 5 | 120 | 0.2 | True | 256 | 8192 |
qwen3.6:35b | 43.82 | 393.53 | 5 | 120 | 0.2 | True | 256 | 8192 |
extra: gpt-5.4-mini | 146.22 | 820.37 | 5 | 120 | 0.2 | True | 256 | 8192 |
extra: gpt-5.4-nano | 154.10 | 932.67 | 5 | 120 | 0.2 | True | 256 | 8192 |
extra: gpt-5.5 | 240.36 | 2532.03 | 5 | 120 | 1 | True | 256 | 8192 |
TTFT ms / TPS)| Model | 256 | 420 | 689 | 1131 | 1855 | 3043 | 4993 | 8192 |
|---|---|---|---|---|---|---|---|---|
deepseek-r1:1.5b | 428.7 / 161.96 | 799.1 / 136.34 | 467.6 / 140.91 | 745.6 / 118.20 | 1101.9 / 136.64 | 2057.6 / 115.74 | 3734.5 / 2323.33 | 8365.7 / 109.83 |
deepseek-r1:14b | 1850.9 / 24.04 | 2675.2 / 23.12 | 2834.3 / 23.66 | 4459.5 / 21.69 | 8047.5 / 21.64 | 14473.9 / 20.20 | 28394.6 / 18.80 | 62332.4 / 0.00 |
deepseek-r1:32b | 4118.3 / 11.10 | 5963.4 / 10.90 | 6538.6 / 11.36 | 10339.6 / 10.94 | 17599.6 / 10.49 | 30579.9 / 10.22 | 56279.6 / 9.59 | 114042.7 / 17.24 |
deepseek-r1:7b | 1238.0 / 41.37 | 1520.1 / 42.54 | 1758.0 / 41.96 | 2279.7 / 43.08 | 3831.8 / 39.18 | 6966.6 / 38.41 | 13241.8 / 35.01 | 27059.7 / 34.08 |
deepseek-r1:8b | 1249.7 / 38.96 | 1759.3 / 36.36 | 1581.6 / 36.83 | 2639.5 / 34.08 | 4399.0 / 33.85 | 8336.1 / 31.38 | 16415.3 / 28.71 | 36080.3 / 24.59 |
gemma4-31b | 4276.4 / 10.04 | 6296.4 / 9.88 | 6747.6 / 9.75 | 11411.5 / 9.86 | 19858.7 / 9.65 | 40756.8 / 9.73 | 136644.3 / 9.08 | 412691.0 / 9.24 |
gemma4:26b | 1539.1 / 38.16 | 2353.9 / 29.87 | 1706.6 / 35.64 | 3227.9 / 30.30 | 4622.3 / 35.60 | 9168.0 / 29.73 | 16423.8 / 34.08 | 36809.2 / 27.72 |
gemma4:e4b | 7438.0 / 23.44 | 18421.3 / 19.24 | 12118.5 / 22.77 | 31385.4 / 18.70 | 33828.8 / 20.98 | 91792.6 / 16.06 | 119861.2 / 16.99 | 359684.5 / 11.55 |
nemotron-cascade-2:30b | 1097.9 / 65.78 | 1696.6 / 60.59 | 1098.9 / 60.52 | 1977.4 / 60.04 | 3135.1 / 61.99 | 5473.3 / 54.60 | 7581.8 / 51.78 | 13900.1 / 50.41 |
qwen3.6:27b | 3516.2 / 10.90 | 5487.2 / 10.62 | 5691.8 / 10.74 | 11068.7 / 10.54 | 20218.5 / 10.64 | 36026.7 / 10.49 | 51709.2 / 10.30 | 94600.6 / 10.06 |
qwen3.6:35b | 1555.5 / 39.17 | 1759.9 / 45.46 | 1760.5 / 41.22 | 3028.3 / 45.46 | 5332.8 / 39.64 | 9476.1 / 42.20 | 13865.3 / 38.54 | 25481.7 / 40.66 |
extra: gpt-5.4-mini | 2421.2 / 182.52 | 911.4 / 112.34 | 879.7 / 166.11 | 1037.7 / 177.67 | 864.7 / 181.73 | 1099.4 / 181.74 | 972.6 / 152.31 | 1101.8 / 136.78 |
extra: gpt-5.4-nano | 756.8 / 200.59 | 916.3 / 193.01 | 969.8 / 202.75 | 999.7 / 257.31 | 660.0 / 179.18 | 1309.9 / 181.85 | 879.4 / 166.73 | 1114.1 / 204.15 |
extra: gpt-5.5 | 675.8 / 56.38 | 1736.0 / 68.90 | 1401.5 / 27.76 | 2199.7 / 129.05 | 1917.5 / 131.38 | 2326.1 / 140.26 | 3584.2 / 61.83 | 2417.5 / 106.07 |
Legend: each context cell is TTFT(ms) / tokens_per_second.
OLLAMA_FLASH_ATTENTION=1OLLAMA_KV_CACHE_TYPE=q8_0OLLAMA_CONTEXT_LENGTH=32768| Model | Avg tokens/s | Avg TTFT (ms) | Prompts | Max tokens | Temp | Stream | Ctx min | Ctx max |
|---|---|---|---|---|---|---|---|---|
deepseek-r1:1.5b | 141.31 | 190.90 | 5 | 120 | 0.2 | True | 256 | 8192 |
deepseek-r1:14b | 24.14 | 396.75 | 5 | 120 | 0.2 | True | 256 | 8192 |
deepseek-r1:32b | 11.16 | 656.98 | 5 | 120 | 0.2 | True | 256 | 8192 |
deepseek-r1:7b | 42.98 | 294.63 | 5 | 120 | 0.2 | True | 256 | 8192 |
deepseek-r1:8b | 38.83 | 337.22 | 5 | 120 | 0.2 | True | 256 | 8192 |
TTFT ms / TPS)| Model | 256 | 420 | 689 | 1131 | 1855 | 3043 | 4993 | 8192 |
|---|---|---|---|---|---|---|---|---|
deepseek-r1:1.5b | 419.5 / 177.26 | 642.4 / 135.83 | 437.8 / 160.39 | 792.7 / 128.23 | 1042.8 / 136.44 | 2004.9 / 111.78 | 3980.5 / 2640.74 | 9439.9 / 91.71 |
deepseek-r1:14b | 1796.4 / 23.79 | 2631.6 / 22.26 | 2683.1 / 23.86 | 4479.4 / 21.28 | 8143.7 / 21.44 | 15357.6 / 20.14 | 30560.9 / 18.19 | 67705.2 / 0.00 |
deepseek-r1:32b | 3910.9 / 11.04 | 6071.4 / 10.88 | 6352.6 / 11.16 | 10480.8 / 10.66 | 17850.9 / 10.56 | 31701.4 / 10.12 | 58965.5 / 9.55 | 120763.5 / 17.22 |
deepseek-r1:7b | 1099.0 / 40.93 | 1469.8 / 45.49 | 1539.4 / 41.95 | 2250.2 / 43.15 | 3988.8 / 38.90 | 7254.0 / 38.20 | 14020.1 / 36.07 | 28857.7 / 32.66 |
deepseek-r1:8b | 1319.7 / 38.04 | 1512.0 / 38.40 | 1713.1 / 34.54 | 2639.4 / 37.76 | 4624.9 / 33.11 | 8594.2 / 31.36 | 17776.0 / 27.54 | 37400.9 / 24.62 |
OLLAMA_FLASH_ATTENTION=1OLLAMA_KV_CACHE_TYPE=f16OLLAMA_CONTEXT_LENGTH=32768OLLAMA_KEEP_ALIVE=1hOLLAMA_NUM_PARALLEL=1OLLAMA_MAX_LOADED_MODELS=1| Model | Avg tokens/s | Avg TTFT (ms) | Prompts | Max tokens | Temp | Stream | Ctx min | Ctx max |
|---|---|---|---|---|---|---|---|---|
deepseek-r1:1.5b | 141.31 | 190.90 | 5 | 120 | 0.2 | True | 256 | 8192 |
deepseek-r1:14b | 24.14 | 396.75 | 5 | 120 | 0.2 | True | 256 | 8192 |
deepseek-r1:32b | 11.16 | 656.98 | 5 | 120 | 0.2 | True | 256 | 8192 |
deepseek-r1:7b | 42.98 | 294.63 | 5 | 120 | 0.2 | True | 256 | 8192 |
deepseek-r1:8b | 38.83 | 337.22 | 5 | 120 | 0.2 | True | 256 | 8192 |
gemma4-31b | 10.71 | 881.20 | 5 | 120 | 0.2 | True | 256 | 8192 |
gemma4:26b | 35.20 | 528.36 | 5 | 120 | 0.2 | True | 256 | 8192 |
nemotron-cascade-2:30b | 59.47 | 353.14 | 5 | 120 | 0.2 | True | 256 | 8192 |
qwen3.6:27b | 10.91 | 565.57 | 5 | 120 | 0.2 | True | 256 | 8192 |
qwen3.6:35b | 43.08 | 370.16 | 5 | 120 | 0.2 | True | 256 | 8192 |
TTFT ms / TPS)| Model | 256 | 420 | 689 | 1131 | 1855 | 3043 | 4993 | 8192 |
|---|---|---|---|---|---|---|---|---|
deepseek-r1:1.5b | 419.5 / 177.26 | 642.4 / 135.83 | 437.8 / 160.39 | 792.7 / 128.23 | 1042.8 / 136.44 | 2004.9 / 111.78 | 3980.5 / 2640.74 | 9439.9 / 91.71 |
deepseek-r1:14b | 1796.4 / 23.79 | 2631.6 / 22.26 | 2683.1 / 23.86 | 4479.4 / 21.28 | 8143.7 / 21.44 | 15357.6 / 20.14 | 30560.9 / 18.19 | 67705.2 / 0.00 |
deepseek-r1:32b | 3910.9 / 11.04 | 6071.4 / 10.88 | 6352.6 / 11.16 | 10480.8 / 10.66 | 17850.9 / 10.56 | 31701.4 / 10.12 | 58965.5 / 9.55 | 120763.5 / 17.22 |
deepseek-r1:7b | 1099.0 / 40.93 | 1469.8 / 45.49 | 1539.4 / 41.95 | 2250.2 / 43.15 | 3988.8 / 38.90 | 7254.0 / 38.20 | 14020.1 / 36.07 | 28857.7 / 32.66 |
deepseek-r1:8b | 1319.7 / 38.04 | 1512.0 / 38.40 | 1713.1 / 34.54 | 2639.4 / 37.76 | 4624.9 / 33.11 | 8594.2 / 31.36 | 17776.0 / 27.54 | 37400.9 / 24.62 |
gemma4-31b | 4397.6 / 10.06 | 6220.6 / 9.82 | 6652.5 / 9.76 | 11416.4 / 9.90 | 20962.1 / 10.34 | 40675.2 / 9.70 | 135690.2 / 9.05 | 411124.6 / 9.25 |
gemma4:26b | 1784.3 / 30.01 | 1912.4 / 36.35 | 2002.9 / 28.85 | 2857.8 / 36.30 | 5111.5 / 29.17 | 8601.7 / 34.24 | 16929.3 / 28.92 | 35758.9 / 32.77 |
nemotron-cascade-2:30b | 978.2 / 63.84 | 1539.3 / 60.44 | 1097.1 / 67.42 | 1798.6 / 56.09 | 2928.9 / 62.82 | 5282.0 / 54.56 | 7328.9 / 51.01 | 13637.7 / 52.39 |
qwen3.6:27b | 3537.2 / 10.85 | 5509.0 / 10.56 | 5746.9 / 10.68 | 11172.7 / 10.51 | 20261.7 / 10.68 | 36068.3 / 10.29 | 51735.6 / 10.32 | 94678.5 / 9.98 |
qwen3.6:35b | 1343.6 / 44.83 | 2194.7 / 39.74 | 1585.0 / 44.90 | 3080.7 / 39.62 | 5332.7 / 42.15 | 9675.2 / 39.09 | 13807.2 / 41.01 | 26637.5 / 37.21 |
After using some of the OSS LLMs for my workflows, I realized: Maybe my context length test is wrong, because in a normal chat session you continue with the exact previous context. In normal usage I experienced TTFT much lower than what I was seeing in my benchmarking. So I rewrote the context size test to actually emulate a "continuing" session. But then I also realized that cache reuse is only possible if the same request gets routed to the same node. So even after these changes, the initial settings performed best; I'll test further variations in future experiments.
| Model | Avg tokens/s | Avg TTFT (ms) | Prompts | Max tokens | Temp | Stream | Ctx min | Ctx max | Connect timeout (s) | Read timeout (s) |
|---|---|---|---|---|---|---|---|---|---|---|
deepseek-r1:1.5b | 162.31 | 218.50 | 5 | 120 | 0.2 | True | 256 | 8192 | ||
deepseek-r1:14b | 24.22 | 403.97 | 5 | 120 | 0.2 | True | 256 | 8192 | ||
deepseek-r1:32b | 11.15 | 630.48 | 5 | 120 | 0.2 | True | 256 | 8192 | ||
deepseek-r1:7b | 43.78 | 253.69 | 5 | 120 | 0.2 | True | 256 | 8192 | ||
deepseek-r1:8b | 38.75 | 267.04 | 5 | 120 | 0.2 | True | 256 | 8192 | ||
gemma4-31b | 10.85 | 898.85 | 5 | 120 | 0.2 | True | 256 | 8192 | ||
gemma4:26b | 37.45 | 502.19 | 5 | 120 | 0.2 | True | 256 | 8192 | ||
gemma4:e4b | 23.21 | 833.10 | 5 | 120 | 0.2 | True | 256 | 8192 | ||
nemotron-cascade-2:30b | 62.52 | 482.47 | 5 | 120 | 0.2 | True | 256 | 8192 | ||
qwen3.6:27b | 10.91 | 608.14 | 5 | 120 | 0.2 | True | 256 | 8192 | ||
qwen3.6:35b | 42.69 | 517.88 | 5 | 120 | 0.2 | True | 256 | 8192 |
TTFT ms / TPS)| Model | 256 | 420 | 689 | 1131 | 1855 | 3043 | 4993 | 8192 |
|---|---|---|---|---|---|---|---|---|
deepseek-r1:1.5b | 386.4 / 170.37 | 633.8 / 128.73 | 467.1 / 154.89 | 797.2 / 150.02 | 1047.0 / 152.96 | 2340.1 / 146.26 | 3648.6 / 208.68 | 8199.2 / 95.43 |
deepseek-r1:14b | 1925.3 / 23.73 | 2855.8 / 22.72 | 2860.2 / 22.71 | 4408.8 / 21.75 | 8118.4 / 21.00 | 14545.2 / 20.23 | 28582.2 / 19.31 | 62470.2 / 16.26 |
deepseek-r1:32b | 3958.9 / 11.09 | 6335.6 / 10.91 | 6457.5 / 10.80 | 10605.9 / 11.05 | 17941.0 / 10.49 | 30800.6 / 0.00 | 56235.0 / 9.53 | 114121.6 / 8.75 |
deepseek-r1:7b | 961.3 / 44.91 | 1520.0 / 41.48 | 1422.5 / 43.70 | 2272.6 / 40.85 | 3806.8 / 38.68 | 6812.1 / 37.37 | 12829.1 / 35.98 | 27943.1 / 33.45 |
deepseek-r1:8b | 1184.7 / 36.78 | 1582.0 / 37.40 | 1756.1 / 36.31 | 2634.8 / 37.90 | 4535.0 / 33.22 | 8299.6 / 30.55 | 16362.9 / 28.29 | 34171.7 / 24.80 |
gemma4-31b | 4578.4 / 10.10 | 6658.9 / 9.76 | 7037.5 / 9.88 | 11862.8 / 9.61 | 20464.6 / 9.74 | 41579.3 / 9.55 | 124721.5 / 9.00 | 561515.7 / 9.11 |
gemma4:26b | 1495.1 / 36.57 | 2438.6 / 29.14 | 1826.3 / 35.80 | 3453.3 / 28.67 | 4894.9 / 34.61 | 9459.4 / 28.73 | 16942.0 / 33.84 | 38030.7 / 28.35 |
gemma4:e4b | 7550.6 / 22.97 | 19217.4 / 15.42 | 12559.8 / 22.26 | 32229.7 / 15.67 | 34552.3 / 20.37 | 91452.3 / 15.03 | 120309.8 / 16.09 | 370979.0 / 11.58 |
nemotron-cascade-2:30b | 1043.1 / 63.70 | 1757.6 / 61.82 | 1249.8 / 63.68 | 2713.2 / 65.17 | 3504.5 / 61.79 | 8272.6 / 37.01 | 7918.5 / 52.50 | 15585.7 / 36.38 |
qwen3.6:27b | 3816.0 / 10.84 | 5900.3 / 10.54 | 6129.2 / 10.68 | 11886.5 / 10.19 | 20982.5 / 10.54 | 37356.6 / 10.29 | 53244.9 / 10.31 | 98825.9 / 9.58 |
qwen3.6:35b | 1856.4 / 38.02 | 1907.7 / 45.11 | 2123.4 / 37.48 | 3325.6 / 45.10 | 6113.1 / 36.96 | 10343.4 / 41.43 | 15384.7 / 34.27 | 26747.8 / 38.07 |
Legend: each context cell is TTFT(ms) / tokens_per_second.
This table compares TTFT (ms) only across context sizes for gemma4-*, nemotron-cascade-*, and qwen3-* over the different benchmark settings.
| Setting | Parameters / benchmark behavior | Model | 256 | 420 | 689 | 1131 | 1855 | 3043 | 4993 | 8192 |
|---|---|---|---|---|---|---|---|---|---|---|
| A) Initial benchmark run | Pre re-run baseline from first matrix (no explicit env overrides listed in that section) | (divider) | - | - | - | - | - | - | - | - |
| A) Initial benchmark run | baseline | gemma4-31b | 4276.4 | 6296.4 | 6747.6 | 11411.5 | 19858.7 | 40756.8 | 136644.3 | 412691.0 |
| A) Initial benchmark run | baseline | gemma4:26b | 1539.1 | 2353.9 | 1706.6 | 3227.9 | 4622.3 | 9168.0 | 16423.8 | 36809.2 |
| A) Initial benchmark run | baseline | gemma4:e4b | 7438.0 | 18421.3 | 12118.5 | 31385.4 | 33828.8 | 91792.6 | 119861.2 | 359684.5 |
| A) Initial benchmark run | baseline | nemotron-cascade-2:30b | 1097.9 | 1696.6 | 1098.9 | 1977.4 | 3135.1 | 5473.3 | 7581.8 | 13900.1 |
| A) Initial benchmark run | baseline | qwen3.6:27b | 3516.2 | 5487.2 | 5691.8 | 11068.7 | 20218.5 | 36026.7 | 51709.2 | 94600.6 |
| A) Initial benchmark run | baseline | qwen3.6:35b | 1555.5 | 1759.9 | 1760.5 | 3028.3 | 5332.8 | 9476.1 | 13865.3 | 25481.7 |
| B) Re-run with KV cache = f16 | OLLAMA_FLASH_ATTENTION=1, OLLAMA_KV_CACHE_TYPE=f16, OLLAMA_CONTEXT_LENGTH=32768, OLLAMA_KEEP_ALIVE=1h, OLLAMA_NUM_PARALLEL=1, OLLAMA_MAX_LOADED_MODELS=1 | (divider) | - | - | - | - | - | - | - | - |
| B) Re-run with KV cache = f16 | flash attention + f16 KV cache | gemma4-31b | 4397.6 | 6220.6 | 6652.5 | 11416.4 | 20962.1 | 40675.2 | 135690.2 | 411124.6 |
| B) Re-run with KV cache = f16 | flash attention + f16 KV cache | gemma4:26b | 1784.3 | 1912.4 | 2002.9 | 2857.8 | 5111.5 | 8601.7 | 16929.3 | 35758.9 |
| B) Re-run with KV cache = f16 | flash attention + f16 KV cache | gemma4:e4b | n/a | n/a | n/a | n/a | n/a | n/a | n/a | n/a |
| B) Re-run with KV cache = f16 | flash attention + f16 KV cache | nemotron-cascade-2:30b | 978.2 | 1539.3 | 1097.1 | 1798.6 | 2928.9 | 5282.0 | 7328.9 | 13637.7 |
| B) Re-run with KV cache = f16 | flash attention + f16 KV cache | qwen3.6:27b | 3537.2 | 5509.0 | 5746.9 | 11172.7 | 20261.7 | 36068.3 | 51735.6 | 94678.5 |
| B) Re-run with KV cache = f16 | flash attention + f16 KV cache | qwen3.6:35b | 1343.6 | 2194.7 | 1585.0 | 3080.7 | 5332.7 | 9675.2 | 13807.2 | 26637.5 |
| C) Re-run with context re-use in benchmark flow | Benchmark changed to emulate continuing sessions (context re-use); same model family scope | (divider) | - | - | - | - | - | - | - | - |
| C) Re-run with context re-use in benchmark flow | continuing-session style context re-use | gemma4-31b | 4578.4 | 6658.9 | 7037.5 | 11862.8 | 20464.6 | 41579.3 | 124721.5 | 561515.7 |
| C) Re-run with context re-use in benchmark flow | continuing-session style context re-use | gemma4:26b | 1495.1 | 2438.6 | 1826.3 | 3453.3 | 4894.9 | 9459.4 | 16942.0 | 38030.7 |
| C) Re-run with context re-use in benchmark flow | continuing-session style context re-use | gemma4:e4b | 7550.6 | 19217.4 | 12559.8 | 32229.7 | 34552.3 | 91452.3 | 120309.8 | 370979.0 |
| C) Re-run with context re-use in benchmark flow | continuing-session style context re-use | nemotron-cascade-2:30b | 1043.1 | 1757.6 | 1249.8 | 2713.2 | 3504.5 | 8272.6 | 7918.5 | 15585.7 |
| C) Re-run with context re-use in benchmark flow | continuing-session style context re-use | qwen3.6:27b | 3816.0 | 5900.3 | 6129.2 | 11886.5 | 20982.5 | 37356.6 | 53244.9 | 98825.9 |
| C) Re-run with context re-use in benchmark flow | continuing-session style context re-use | qwen3.6:35b | 1856.4 | 1907.7 | 2123.4 | 3325.6 | 6113.1 | 10343.4 | 15384.7 | 26747.8 |
So after that change, TTFT still stayed roughly the same (but now we know we need some sort of cache-hit / node-reuse strategy in the future).
That must be it for now, the article is way too long already. I'm starting to actively use my own hosted models for different things and will report back further in the future.
Cheers Tim
Related
A production-style setup to publish private k3s services through a public microk8s edge cluster using the Tailscale Kubernetes Operator.
Related
A full copy/paste-ready walkthrough to install CloudNativePG, deploy PostgreSQL on Kubernetes, bootstrap users and tables, and verify with Python.
Related
Setup a Microk8s node on only VPS (updated)